Baked Buffalo Cauliflower Bites

I’m on a cooking spree lately and always looking for healthy snacks.  These cauliflower bites are easy to make and they’re healthy.  I’ve made these for a Super Bowl party, but it doesn’t have to be football season to enjoy all things doused in buffalo sauce.

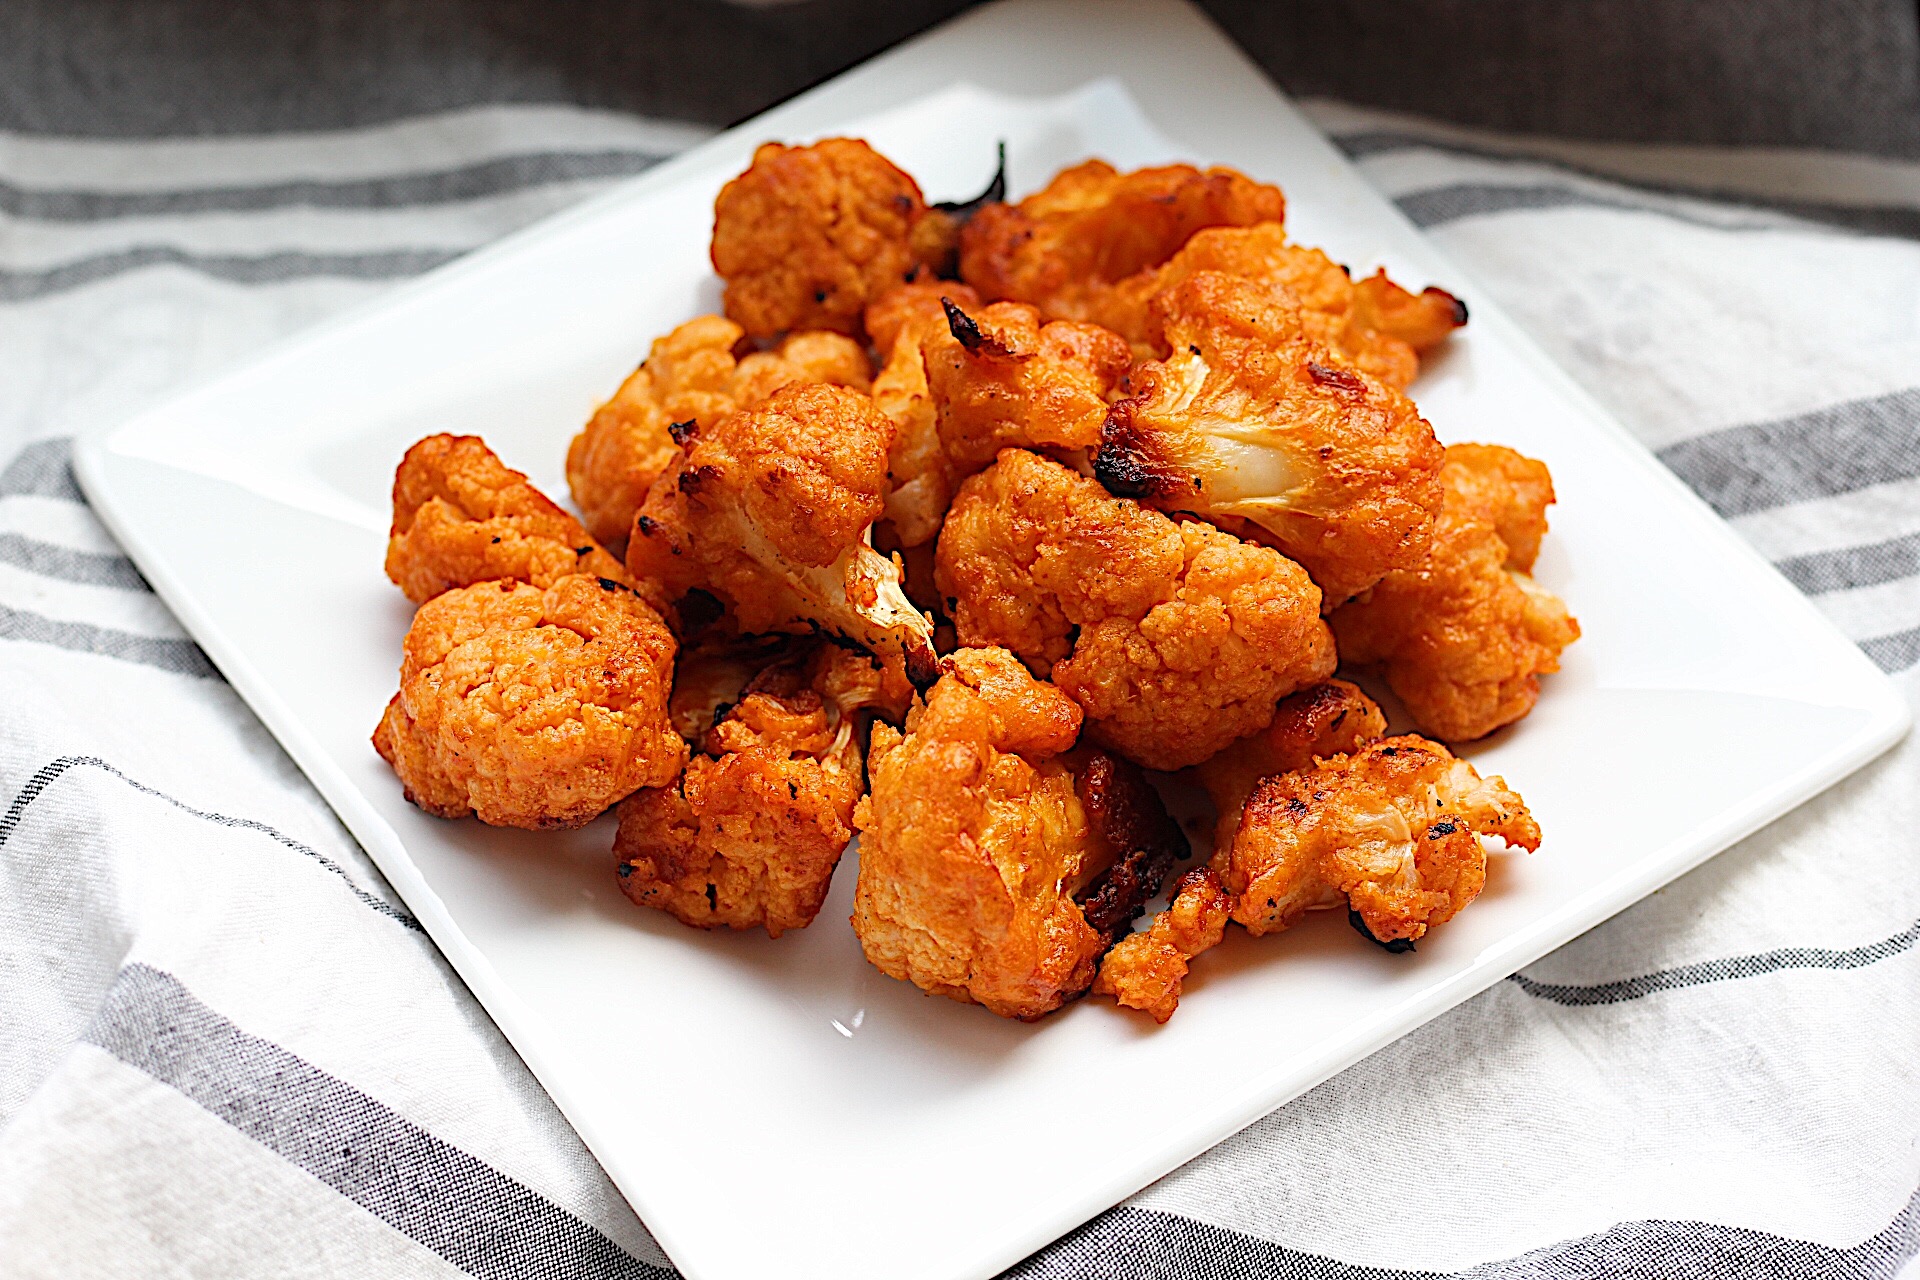
You can eat these alone or dip in ranch if you prefer – they’re delish either way.  Pro tip:  Make a double batch because these little bites of goodness go quickly.

INGREDIENTS
  • 1 medium cauliflower, cut into bite-sized pieces
  • 1/2 cup flour
  • 1/2 cup water
  • 1 teaspoon garlic powder
  • 1/2 teaspoon salt
  • 1/4 teaspoon black pepper
  • 2 tablespoons butter, melted
  • 2/3 cup Buffalo hot sauce (Moore’s Buffalo Sauce is a fave of mine)

INSTUCTIONS

  1. Preheat oven to 450 degrees, line a large cookie sheet with aluminum foil, spray with cooking spray and set aside.
  2. In a large bowl whisk together flour, water, garlic powder, salt and pepper. Depending on the consistency, you might need to add a little extra water to the mixture if it’s too thick.  Add cauliflower florets and toss to coat. Spread evenly onto cookie sheet and place in the oven. Bake for 15 minutes, flipping once. Remove from the oven.
  3. In a separate bowl stir together melted butter and buffalo sauce. Add baked cauliflower and toss to coat.
  4. Remove the aluminum foil and replace with a new sheet.  Spray the foil with cooking spray.
  5. Spread the coated cauliflower evenly onto cookie sheet. Place back in the oven and bake for 25-30 minutes or until crispy, flipping once.
  6. Remove from oven and let sit 10 minutes before serving.
  7. You can serve them with your fave dip or alone.  Enjoy!
Advertisement

Scones and Snaps

Photography: Elizabeth Ballard

I’ve always had an interest in food photography and i’m inspired by so many incredible photographers and food stylists around the world.  They set themselves apart by developing their own aesthetic and I wanted to do the same.  Instead of taking a series of lessons, I wanted to consult with someone who could help me establish my own look/feel and brush-up on my photography skills.  I made the decision to invest in a quality camera and find an incredible photographer to consult with me.  Amy Stallard was the perfect match and we clicked immediately.  This is just the beginning and i’m really looking forward to more sessions, but I am so happy with what we’ve created together.

I’ve include two of my favorites and I can’t wait for our next session.  I’m not much of a baker, but knew the vibrant lemon and blueberry hues would look beautiful when photographed.  You can find the easy scone recipe below because you’re going want to make them after seeing how delicious they look!  Hope you enjoy the snaps and scones 🙂

Photography: Elizabeth Ballard

Blueberry Scones with a Lemon Glaze (courtesy of Tyler Florence)

Ingredients
Blueberry Scones:
2 cups all-purpose flour
1 tablespoon baking powder
1/2 teaspoon salt
2 tablespoons sugar
5 tablespoons unsalted butter, cold, cut in chunks
1 cup heavy cream, plus more for brushing the scones
1 cup fresh blueberries

Lemon Glaze:
1/2 cup freshly squeezed lemon juice
2 cups confectioners’ sugar, sifted
1 lemon, zest finely grated
1 tablespoon unsalted butter

Directions

  1. Preheat the oven to 400 degrees F.
  2. Sift together the dry ingredients; the flour, baking powder, salt, and sugar. Using 2 forks or a pastry blender, cut in the butter to coat the pieces with the flour. The mixture should look like coarse crumbs. Make a well in the center and pour in the heavy cream. Fold everything together just to incorporate; do not overwork the dough. Fold the blueberries into the batter. Take care not to mash or bruise the blueberries because their strong color will bleed into the dough.
  3. Press the dough out on a lightly floured surface into a rectangle about 12 by 3 by 1 1/4 inches. Cut the rectangle in 1/2 then cut the pieces in 1/2 again, giving you 4 (3-inch) squares. Cut the squares in 1/2 on a diagonal to give you the classic triangle shape. Place the scones on an ungreased cookie sheet and brush the tops with a little heavy cream. Bake for 15 to 20 minutes until beautiful and brown. Let the scones cool a bit before you apply the glaze.
  4. Technically you should make this simple lemon glaze in a double boiler (i.e. over a pot of simmering water with a heatproof bowl set on top) but it’s even simpler to zap it in the microwave. Mix the lemon juice and confectioners’ sugar together in a microwave-safe bowl. Stir until the sugar dissolves. Add the lemon zest and butter. Nuke it for 30 seconds on high. Whisk the glaze to smooth out any lumps, then drizzle the glaze over the top of the scones. Let it set a minute before serving.

Roasted Sweet Potato, Wild Rice, and Arugula Salad

Happy New Year!  Hope your January is off to a good start.  The holiday’s came and went so quickly, but I am excited to see what 2017 has in store.

Like most, I am committed to get my health back on track after indulging in too much food and drink over the past month (or even longer- let’s be honest).  I found this great recipe from pinch of yum that I was dying to try and it was a total hit over Christmas.  I made this as a side dish for Christmas day and my family ate it up.  Not only was it easy, but the colors were vibrant and the flavor was spot on.  I’ve included the recipe below and opted for gluten free wild rice since my sister is G-Free.  Have a happy and healthy new year!

img_4583

INGREDIENTS
  • 2 cups cooked wild rice (about ½ cup raw)
  • 2 large sweet potatoes, peeled and diced (about 3-4 cups)
  • 1 tablespoon olive oil
  • 1 teaspoon chili powder
  • salt and pepper to taste
  • 3 cups arugula
  • ½ cup cashew pieces
For the dressing
  • ¼ cup freshly squeezed lemon juice (about 2 lemons – more to taste)
  • zest of the lemons
  • ⅓ cup good quality olive oil
  • 2 teaspoons agave nectar
  • 2 cloves garlic
  • ¼ teaspoon salt
 img_4587
INSTRUCTIONS
  1. Cook the wild rice according to package directions. Meanwhile, make the dressing by pureeing all the dressing ingredients in a food processor or you can whisk them together for the same affect. When the rice is done, toss it with a little bit of the dressing and refrigerate. Let it rest for a little while so it takes on the flavors of the dressing.
  2. Preheat the oven to 350 degrees. Place the sweet potato pieces directly on a baking sheet. Drizzle with the oil and sprinkle with the chili powder, salt, and pepper. Stir directly on the pan to get everything mixed. Roast for 20-25 minutes (I like mine a little crispy), stirring every so often to keep from burning. When the sweet potatoes are golden brown on the outside, remove from the oven and set aside.
  3. Toss the arugula, wild rice, sweet potatoes, cashews, and the remaining dressing together. Serve warm or cold.

Pearl Couscous, Mushroom and Kale with Balsamic

Peal couscous is delish, light, and versitile.  It’s great on it’s own or mixed with your favorite veggies for an instant side dish.  Althought it’s a noodle, it has protein so that makes it healthy- right?  I went to the farmers market and bought a ton of mushrooms and kale to cook up throughout the week.  In an effort to bring my lunch to work more often, this is a great dish to make on a Sunday and snack on throughout the week.  The flavors continue to set in and it adds another demension.  Best part, it takes about 20 min to make.  Enjoy!

IMG_2329

INGREDIENTS
  • 3 Cups pearl couscous, uncooked
  • 3 T Olive oil (2 T for sauteing, 1 T to mix in cooked couscous)
  • 2 Garlic cloves, minced
  • ½ Medium onion, diced
  • 1 lb Mushrooms, sliced
  • 2 Cups Kale, thinly sliced
  • 4 T Balsamic vinegar (I used meyer lemon white balsamic) (2 T for cooking mushrooms in, 2 T to add into cooked couscous)
  • 2 T Balsamic glaze to drizzle on top
  • Salt and pepper to taste
INSTRUCTIONS
  1. Heat a large saute pan over medium heat. Add 2 T olive oil & let it heat up.
  2. Slice the mushrooms, dice the onion, minced the garlic and thinly slice the kale.
  3. Add the onions to the pan, cook for 5 minutes. Add the garlic, cook for 1 minute or until fragrant.
  4. Add the sliced mushrooms, cook for 5 minutes & let the mushrooms sit, don’t stir! Reduce heat to medium-low and add 2 T balsamic vinegar. Stir and saute for another 5 minutes or until the mushrooms have absorbed the balsamic.
  5. While the mushrooms are cooking, cook the pearl couscous according to package directions.
  6. When the couscous is done cooking, add it to the large pan with the mushrooms. Stir to combine.
  7. Add 2 T balsamic, pepper and salt to taste.
  8. Add the sliced kale.
  9. Drizzle balsamic glaze over the top & enjoy!

Taco Tuesday

Call me basic, but I do love Taco Tuesday!  Now that summer is here, it’s time to switch up your typical tacos.  I was looking for a way to incorporate the chili lime rub I received as a gift and it turned out to be the inspiration for this meal.  I made light and delicious mahi mahi fish tacos with an avocado spread.  The light and flaky fish is perfect for baking or grilling.  You don’t have to use the rub, but it’s an easy way to incorporate a lot of flavor.

IMG_2144

Ingredients:

Avocado Lime Sauce

  • ½ cup sour cream
  • 1 ripe avocado
  • 2 tablespoons fresh cilantro
  • 1 tablespoon fresh lime juice
  • Zest of 1 lime

IMG_2143

Mahi Mahi Tacos

  • 2 tablespoons of Chile Lime Rub
  • 1½ pounds Mahi Mahi filets, cut lengthwise into smaller pieces if needed
  • Nonstick olive oil spray
  • 8 (6-inch) corn tortillas
  • 8 lime wedge
  • 1 bag of coleslaw
  • Cilantro, for garnish

Instructions:

  1. Combine sour cream, avocado, cilantro, lime juice, and lime zest in a food processor; process until smooth. Transfer to a small bowl and refrigerate.
  2.  Preheat the oven to 400 degrees.  Line a baking sheet with aluminum foil and spray with nonstick olive oil spray.
  3. Sprinkle seasoning evenly over both sides of the fish filets and add to the baking sheet.
  4. Bake in the oven for 15 minutes until golden brown.
  5. Warm tortillas according to package directions. Divide fish evenly among tortillas. Serve with avocado lime sauce, lime wedges, cabbage, and cilantro.

Zucchini Noodles with Shrimp and Pesto

This dish was easy and damn delicious!   I typically like to make a more challenging meal on Sunday’s since I have the time, but I had a hankering for something light.  Zucchini noodles are one of my favorite veggies to use as an alternative to pasta and they taste amazing.

I paired the tender zucchini noodles with perfectly sauteed shrimp tossed in a delicious basil pesto sauce.  Pesto sauce is very easy to pull together and adds so much flavor.  I’ve included an easy pesto recipe below in case you want to make your own.

Pesto Sauce

IMG_1954

Ingredients:

  • 1/2 cup pine nuts
  • 3-4 cloves garlic (depends on how much garlic you like)
  • 3 cups fresh basil leaves, packed
  • 1/2 cup freshly grated Parmesan
  • 1/2 cup extra-virgin olive oil
  • Salt and freshly ground black pepper to taste (or about 1/2 tsp. of each)
 Instructions:
  1. In a food processor or blender, blend together basil, nuts, garlic, and cheese.
  2. Pour in oil slowly while still mixing, and then add in salt and pepper.
  3. Scrape down the sides and pulse once more to make sure it’s well-blended.

Zucchini Noodles with Shrimp and Pesto

IMG_1962

Ingredients:

  • 2 tablespoons olive oil, divided
  • 1 bag (12-ounces) Jumbo Cooked Shrimp, peeled and deveined
  • 1/2 lemon for juicing
  • 4 zucchini, spiralized
  • Salt and fresh ground pepper, to taste
  • ½-cup basil pesto (you can use as much as you prefer)
  • Freshly grated Parmesan cheese (optional)

Instructions:

  1. Heat 1 tablespoon olive oil in a large skillet over medium-high heat.
  2. Season shrimp with salt and pepper and add to skillet; sautee for 2 to 3 minutes.
  3. Squeeze juice of a 1/2 lemon
  4. Remove from skillet and set aside in a bowl.
  5. Add remaining olive oil to skillet
  6. Add zucchini to skillet and continue to cook for 7 minutes, or until tender, stirring frequently.
  7. Add shrimp back to skillet, stir in pesto, and cook just until things are heated through.
  8. Transfer to a serving bowl.
  9. Sprinkle with Parmesan cheese (optional)
  10. Serve


Easter Delights

Although it doesn’t feel like Spring in Chicago, Easter is just around the corner.  Whether you’re hosting or attending Easter festivities on Sunday, I’ve compiled few of my favorite goodies for inspiration.

Hatching Chick Deviled Eggs 

Eggs
Courtesy: SheKnows

Ingredients:

  • 6 boiled eggs
  • 2 tablespoons mayonnaise
  • 2 teaspoons yellow mustard
  • 1 pinch kosher salt
  • 1 carrot, julienned
  • 12 black peppercorns

Instructions:

  1. Lay an egg on its side, and cut a small slice off the bottom (flatter) end. This is the base of the chick. Then cut about 1/2 – 3/4 inch off the top (pointy) end. This end piece is going to be the top of your chick.
  2. Scoop all the yolks out of the eggs (don’t forget the tops too), and mix them with the mayonnaise, mustard and salt. Put this filling into a plastic bag with a corner end snipped off, and pipe it into your eggs. Make sure the filling is about an inch taller than the top of the egg white so you will have plenty of room to make a face.
  3. Place a top slice of egg white on each chick.
  4. Use a knife to slice your julienned carrot into pieces 1/2 inch long. Place 2 peppercorns and a piece of carrot into the yolk of each egg to make the face. You may find it easier to use tweezers for these tiny pieces.
  5. Arrange the eggs on your serving tray, then add feet by slipping the remaining slices of carrot under their bodies. Again, tweezers can help with this step. Place 3 pieces together on each side to make the feet.
  6. Serve cold. Best served within 2 hours.

Tulip Tomatoes

Tulip Tomatoes
Courtesy: A Few Short Cuts
Ingredients:
  • 15 Large Cherry Tomatoes
  • 16 stalks of chives
  • 8 oz. cream cheese
  • 1 cucumber
  • 1 teaspoon dried basil
  • Salt and pepper
Instructions:
  1. With stem side down, cut a cross in the top of each cherry tomato (about ¾ down the tomato).
  2. Using a spoon (grapefruit spoon works very well) to gently scrape out the tomato seeds.
  3. Take a grilling skewer or toothpick and make a hole where the stem currently is. You may need to twist the skewer in a circle a few times to make room for the chive to fit through.
  4. Finely chop or grate cucumber.
  5. Mix cream cheese, cucumber and basil in a bowl. Add salt and pepper to taste.
  6. Add a teaspoon of cream cheese mixture into each tomato tulip (adjust depending on size of tomatoes).
  7. Insert a chive into the hole at the bottom of each tomato.
  8. Use a damp paper towel to clean any excess cream cheese filling from outside of tomatoes.
  9. Prepare the tulip bouquet on a large plate or platter. Use the extra chive stalk to wrap around the tulip stems to complete the bouquet.

Ricotta with Lemon, Basil, and Honey Bruschetta

RicottaBruch
Courtesy: Reluctant Entertainer

Ingredients:

  • Fresh ricotta
  • Lemon zest
  • Toasted bruschetta (baguette bread)
  • Basil leaves
  • Delicate honey, such as acacia

Instructions:

  1. Prepared baguette toasts.
  2. Mix fresh ricotta with lemon zest, and spread onto toasts (do not rub with garlic or drizzle with oil in this variation).
  3. Add a few basil leaves, and drizzle with a delicate honey

Meyer Lemon Bars

Meyer Lemon Bars
Courtesy: foodiecrush

Ingredients:

  • ½ cup powdered sugar
  • 1 cup butter (2 sticks), softened
  • 2 cups plus ½ cup all-purpose flour
  • 4 eggs
  • 2 cups sugar
  • ⅓ cup fresh squeezed Meyer lemon juice
  • 1 heaping tablespoon grated lemon zest
  • ½ teaspoon baking powder

Instructions:

  1. Preheat oven to 350 degrees F. Prepare a 9″ X 13″ baking pan by lining it with criss crossed pieces of aluminum foil that have an overhang of an inch or two. Spray with cooking spray unless using non-stick aluminum foil.
  2. Cream the powdered sugar and butter in a stand mixer until light and fluffy. Add 2 cups of the flour and beat on medium speed until mixed. Press into the bottom of the prepared baking pan and bake for 15-20 minutes or until golden.
  3. Beat the eggs, sugar, Meyer lemon juice and lemon zest in a large bowl either by hand or with a mixer. Sift the reserved ½ cup flour and baking powder into the mixture and mix well.
  4. Pour over the hot crust and return to the oven to bake for another 20-25 minutes. Check for doneness at 20 minutes, and add on time as needed.
  5. Cool completely before cutting, then dust with powdered sugar and serve.

Not Your Mama’s Meatloaf

I’m a huge fan of classic meals with an updated/healthy twist.  There’s something so comforting about turkey meatloaf on a rainy cold day like we had here on Sunday.  I’ve been making this recipe for years and it’s easy, healthy and delicious.  This is a great meal to make on a Sunday and have or lunch/dinner throughout the week.  As you can see, turkey meatloaf does not photograph well, but I promise it tastes really good:)  I like to pair my dish with cauliflower mash to get my mashed potato fix.

IMG_1848

Ingredients:

  • 1 Tbsp olive oil
  • 3/4 cup sweet onion, finely chopped
  • 1/4 cup sweet pepper(s), finely chopped (you can use green- i’m not a fan)
  • 2 cloves (medium) garlic clove(s), minced
  • 1/4 cup low-fat shredded cheddar cheese, sharp
  • 1/4 cup seasoned bread crumbs
  • 1 1/2 tsp Italian seasoning
  • 1 tsp ketchup
  • 1/2 tsp table salt
  • 1/2 tsp black pepper
  • 1 large egg, lightly beaten
  • 1 1/4 pound(s) uncooked ground turkey breast
  • Nonstick cooking spray
  • 1/2 cup ketchup
  • 1 Tbsp unpacked light brown sugar
  • 1 tsp mustard

Instructions:

  1. Preheat oven to 350°F.
  2. Heat oil in a large nonstick skillet over medium-high heat.
  3. Add onion, bell pepper and garlic; sauté 3 minutes. Cool.
  4. Combine onion mixture, cheese and next 6 ingredients in a large bowl; toss to moisten bread.
  5. Crumble turkey over onion mixture; stir just until blended. Pack meat mixture into an 8 x 4-inch loaf pan coated with cooking spray.
  6. Bake at 350°F for 35 minutes (without the ketchup mixture)
  7. Combine 1⁄2 cup ketchup, brown sugar and mustard in a small bowl; stir well.
  8. Spread ketchup mixture over meat loaf and bake an additional 5 minutes.
  9. Let stand 10 minutes. Remove meat loaf from pan. Cut into 10 slices.

Baked Polenta Fries

It’s no secret, fries of any kind are my favorite food group.  I’ve had polenta fries several times, but have never attempted to make them so I finally gave it a whirl.  They’re pretty easy to make and the best part is that you can dip them in marinara or aioli.  I made an easy Greek yogurt dip that’s worth trying if you like a little tang.

FullSizeRender

Ingredients

  • 2 cups water
  • 1 cup milk (I used organic 1% milk)
  • 1 1/2 cups polenta or yellow cornmeal
  • 1/2 cup grated Parmesan
  • 3 Tbsp. olive oil (plus more the grease the baking sheet)
  • Salt and pepper to taste
  • Fresh garlic (3 cloves)
  • 1 lemon
  • Fresh basil (small bunch)
  • Fresh rosemary (4-5 sprigs)

Greek Yogurt Dip

  • 1/2 cup 2% Greek yogurt
  • 1 tbsp minced garlic
  • Juice of 1 lemon
  • Salt and pepper to taste

Instructions

  1. Boil water in a large saucepan. Gradually add polenta, stirring constantly with a whisk. Add the milk. Cook, stirring constantly, until mixture thickens and boils, around 10 minutes.
  2. Turn the heat off, stir in Parmesan and season with oil, salt and pepper. Spread polenta evenly onto a 8½×12-inch baking sheet. Press plastic wrap onto surface; chill in the fridge at least 1 hour.
  3. Preheat oven to 400°.
  4. Finely chop the fresh basil and rosemary
  5. Combine yogurt, minced garlic, lemon juice, salt and pepper.  Refrigerate until ready for dipping.
  6. Uncover polenta and cut into 4×¼-inch strips. Sprinkle some Parmesan, salt, pepper and separate fries. Arrange on a greased baking sheet (I used nonstick spray).
  7. Bake fries around 25–30 minutes. Sprinkle with fresh herbs and let them cool for at least 15 minutes before serving them along with your favorite dip.

Eggcellent Breakfast

Breakfast is the most important meal of the day, but I’m guilty of running out the door without it.  Meal prep on Sunday has become a crucial part of staying on track for the week.  I’ve been making these yummy little egg muffins for quite some time and they are an easy grab-and-go option you can make ahead.  You can make them with whatever ingredients you like and heating up is a cinch.  Here’s my go-to recipe I like to cook up on a Sunday for the week and I love to top them with a little salsa- yum!

IMG_1610

Ingredients:

  • 1 lb Lean turkey breakfast sausage
  • Liquid eggs
  • 8 oz Sliced mushrooms
  • 1 bag fresh Spinach
  • 1 tbsp Coconut oil
  • Salt and pepper

Instructions:

  1. Preheat your oven to 350 degrees
  2. Spray non-stick spray in pan and cook ground turkey breakfast sausage all the way through and set aside
  3. Using the same pan, add 1 tbsp of coconut oil and add mushrooms to the pan
  4. Once the mushrooms have cooked down, add spinach to the pan and wilt down
  5. Add the mushroom and spinach mixture to the cooked breakfast sausage
  6. Spray muffin tin with non-stick spray
  7. Fill the muffin tin with the mixture about half way and add the liquid eggs.  Try not to fill to the top as the eggs will puff up in the oven.
  8. Place the filled tins into the oven for about 20 minutes
  9. If making ahead, allow to cool before placing into the refrigerator
  10. When reheating- place into the microwave for about 20 seconds to heat all the way through
  11. Top with salt/pepper and your favorite salsa- Enjoy!

IMG_1651